|
Remember these? With the leftover yarn, I figured I could create matching doll sweaters! Yes, yes, I know, I swore I'd never use this yarn on tiny needles and do seed stitch again, but they're little itty-bitty sweaters. The dolls are only about 12" around, and the sweaters only need to be about 6" long, after all!

|
|
The pattern is loosely modeled after the Embroidered Cardigan from Vogue Knitting Baby Gifts, but since I changed the contruction, sizing, gauge and embellishments, I think it's safe enough to post.
The sweater should fit a standard 14" doll - the ones I bought are the soft body kind, but I imagine it would work on the plastic body ones too.
|
Materials
| | Yarn
Lion Brand Micro-Spun, 1 skein main color, small amount of green (optional - for flower stems) | 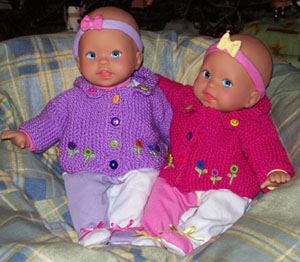 |
| | Buttons
6 - 1/2" buttons, decorative smiley face and flower buttons (optional) |
| | Needles
US 2 (3 mm) circular needles
US 2 (3 mm) DPNs, or second circular, or use the single circular "magic loop" method (for sleeves)
or size needed for gauge |
| | Misc
stitch markers, stitch holders, yarn needle |
Gauge
22 stitches/32 rows = 4" (row gauge isn't terribly important for this project)
Body
Note: the body is worked in one piece to the underarms, then split. Sleeves are picked up and knitted from the top down.
Cast on 73 stitches.
Working in seed stitch, work 17 stitches, place marker; work 39 stitches, place marker; work remaining 17 stitches.
Continue in seed stitch until piece measures 3 1/2 inches, ending with a WS row.
The following three sections can be done simulataneously if you wind three separate balls of yarn, or they can be done one at a time:
Right Front
Work to first marker, leave remaining stitches on needles and turn.
Work on these 17 stitches until the right front measures 5 inches, ending on a WS row.
Neck Shaping:
row 1: Bind off 3 stitches, work to end of row.
row 2: Work even.
row 3: SSK, work to end of row.
row 4: work even.
Repeat rows 3 and 4 four more times.
Work even until left front measures 6 1/4 inches, ending on a WS row.
Leave remaining 9 stitches on a holder.
Back
With RS facing, join yarn to back section, work to second marker and turn.
Work 39 stitches of back until back measures 6 1/4 inches, ending on a WS row.
Put stitches on a holder.
Left Front
With RS facing, attach yarn to left front section, work remaining stitches and turn.
Work on these 17 stitches until the left front measures 5 inches, ending on a RS row.
Neck Shaping:
row 1: Bind off 3 stitches, work to end of row.
row 2: Work even.
row 3: SSK, work to end of row.
row 4: work even.
Repeat rows 3 and 4 four more times.
Work even until left front measures 6 1/4 inches, ending on a WS row.
Leave remaining 9 stitches on a holder.
Shoulders
Bind off shoulders with three needle bind-off, leaving center 21 stitches of back on a stitch holder.
Sleeves
With RS of work facing and starting at bottom center of armhole, pick up and knit 30 stitches around armhole. Place marker and join.
Using your favorite method of working small numbers of stitches in the round,
work sleeve, decreasing one stitch each side of marker every 5th round to 24 stitches.
Work even until sleeve measures 3 inches from armhole, or length desired.
Bind off all stitches in pattern.
Repeat for second sleeve.
Collar
With RS facing, pick up and knit 15 stitches along right front neck edge, work seed stitch across 21 stitches of back, pick up and knit 15 stitches along left front neck edge.
Work even in seed stitch until collar measures 3/4 inch. Bind off in pattern.
Button Band
With RS facing, pick up and knit 25 stitches along left front of sweater. Work 5 rows in seed stitch. Bind off in pattern.
Buttonhole Band
With RS facing, pick up and knit 25 stitches along right front of sweater. Work 2 rows in seed stitch.
Next row: work 2 stitches, (k2tog, YO, work 4 stitches) 3 times, k2tog, YO, work 3 stitches
Bind off in pattern.
Embellishment
Add buttons to points of collar
Use buttons and satin stitch stems in contrasting thread for flowers
Attach buttons on button band
|